Oh look what a good girl I am... I said I would show you a DIY and I actually followed through! Now, that is progress my friends!
This is pretty easy little project, and takes just a few supplies. If you are a scrapbooker, you probably have these in your back pocket!
1. scrap booking papers.
I used 3 different patterns of 12X12 cardstock.
2. hearts. I cut 3" hearts with my cricut, but you can hand cut or use heart doily's or pre-cut hearts. You will need 3 hearts per heart...oh, how do I say that? 3 hearts to make 1 little 3-D heart. Does that make sense?
3. Bone folder. I used my paper cutter than has a blade that doesn't cut through the paper...
dang, what is that called? SCORING BLADE! Geesh, don't ask how long it took me to find that on google!
the Black one is the scoring blade...
4. Glue. After some trial and error, I found a slower drying glue works best, like a glue stick! You want to be able to move the hearts a bit and line them up before they stick tight!
5. Twine or ribbon or cord...whatever you want to hang it with!
I made my tutorial with some bright pink paper hoping that would be easier to see, here we go...
Grab your hearts and bend them all in 1/2. If you are using 1 sided patterned paper make sure you fold the pattern IN on itself.
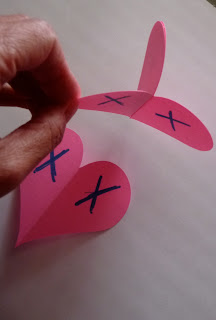
Grab your 1st 2 hearts
See the 2 pink "X's"? Put glue on those sides and glue together.
You'll get this
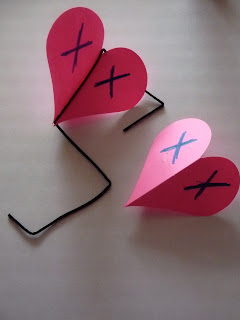
See the blue "X's"? You're going to glue those together, but 1st, put a bead of glue down the "crack" (a glue like Elmer's is going to be better than a glue stick for this part). You're going to lay the string in the glue.
To make mine, I decided to put a heart about every 6 inches. I left the twine on the ball and just pulled off what I needed as I went along. I knew if I cut it 1st I'd cut it too short... did you know my best grade in math was like a D-? Numbers are NOT my friend, unless it's 75% off, then I can figure that like an idiot savant!
So there you have it! And... you don't have to just use hearts, you can use any shape that when folded in 1/2 matches up... I've seen these made with circles cut out of vintage books or sheet music! Very cute!!
What do you think? Do you like it? Well, guess what??!! You can WIN this one! Yep, I'm giving it AWAY!! You know, 'cause it's MY BIRTHDAY MONTH!!
All you have to do:
1. Leave a comment on THIS post!! ONLY this post...
Want an extra entry?? Here's how (make sure you leave a SEPARATE comment for EACH entry!!)
- leave a comment
- become a follower
- IF you are a follower, bring someone new on board
- twitter this
- put it as your facebook status
- blog about it
If you make your own link me to your pictures!
Share the love, I'm almost at 200 followers and you know I'm shooting for 2,000!
We're snowed in again today, so look for more cute papercuts in my store soon


11 comments:
Ohhh it's really, really, cute!! I am so proud of you for following through!!
That's so cute!
Hi there! Very cute DIY project, you did a fantastic job.
so cute...i love it! just added to my things to do for V-Day!!!
Oh and I blogged about it :)
You are so special! Giving away gifts for your birthday! The banner is adorable. Sitting ovation!
Cuteness!
This is DARLING!
OMG, I just about cracked up after reading this post since at the bottom of the post there was the link to "Jamie Lee, do you want to see my poo!".......I just about spit out my water!
You crack me up!
xoxo
So cute and simple! :0)
thanks everyone, keep the comments coming!!
That is very cute. I like all your paper cuts.
Post a Comment