Wednesday, November 26, 2008

Turquoise & Turkey's

I'm sorry i've neglected you all when i was on such a roll the previous week... I've been putting on my Martha Stewart cap & getting all crafty & Christmasy! We put up the tree & I decided i wanted to go all Turquoise (& red) this year... so that, of course, necessitated a trip to: HOBBY LOBBY! I got silver balls & turquoise paint & turquoise tulle. Painted poka-dots on the ornaments & tied tulle bows- pretty cute if i do say so myself!

As many of you know, my daughter was adopted from China, so i found these a couple years ago at... Hobby Lobby & just had to have them.... & Yes, i do know Sumo wrestlers are from Japan, but I couldn't help myself!

a few more.... what IS in that box? i've never had chinese food that looks like sparkly bubbles...In the little frame is a picture of my daughter - her 1st Christmas in America & with her family!

I know i'm a bit early with a "Christmas post", but then again the stuff's been out since... early Oct!!

I hope you all have a lovely Thanksgiving & remember how lucky we really are! So many things to be thankful for, i mean really.... Enjoy friends & family, stuff yourself silly, & be safe out there!

Happy Thanksgiving & thank you for all the support given to me with my etsy shop & blog!

Love,

Misschell

Friday, November 21, 2008

Don't worry...

JUST in case anyone thinks that MAYBE i have got it all together, or that perhaps i'm a "classy gal", i felt like i should set the record straight! You are NOT alone.... Do you read some of these blogs & think "geesh, she is SUPER woman: crafts, kids, published works, perfect house, stunning husband, full time job, no hair on the bathroom floor..." the list goes on & on... Let's admit it, it's just too much work & who wants to be perfect anyway??....

Just for fun, thought you might want to try "Bubble Tea", I haven't yet, but think i will...

Classic Bubble Tea Recipe
1/2 cup chilled, cooked large Chinese tapioca pearls (if substituting regular small tapioca, use 1/3 cup)

1 cup crushed ice 1 cup very strong chilled black tea (or orange pekoe tea or Lichee tea)

1 cup milk, or to taste Honey or sugar to taste
Place the pearls in a large parfait glass. Combine all remaining ingredients in a cocktail shaker, and shake vigorously until the mixture is frothy. Pour into the glass, and serve with extra-thick straws.
Yields one (16-ounce) drink.

Have a great weekend, we're off to see "Bolt" tonight...

Thursday, November 20, 2008

Better late than never...


My friend was just here to pick the birthday gifts for her sister & Mom... I snapped some pictures before she left, here they are:

This is a cupcake for her sisters 50th birthday, it says "50 the new 30", there are all kinds of gems & beads, along with a golf club bag & angel charm. On the front is a little cork hanging that i was going to put a little jar of glitter on, but after i got it on, i didn't like it... I replaced it with a bead, but didn't grab another pic... I was so glad that i had bought this little Chinese take-out box at Target on CLEARANCE, the cupcake fit in it perfectly & it looked SO CUTE!

The next thing i embellished, a little putter...


The ribbon reads "still sexy at 70", and is for her Mom. She & her sisters & Mom are headed for a fun filled weekend in Chicago! I hope they ♥LOVE♥ their gifts, it was such a FUN project!!

Wednesday, November 19, 2008

Oops... forgive me!

I know i said i would be right back with pictures of my projects, but... parent conferences, a visit to friend of the court (don't get me started..) & just some misc. anxiety got in the way... that & the fact that i am THE QUEEN of Procrastination (i should make a crown for that...).
BUT- I do have a picture of my glitter banner that i am SOOOO pleased with...

I will be the 1st to admit, my pictures are bad... they are NOT good at all, maybe because it's my least favorite part- being all technical & junk, or maybe it's my camera? (again with the "hint, hint"). The letters want to turn a little bit so i'm going to put those little sticky clear thingy's are the back & press the string into them, or... string it on a thicker ribbon- not sure yet. The string is that bakers string by Martha Stewart. 6 Cute little rolls that have no beginning or end... Seriously, i had to just cut & hope i was close to 1 end or the other. Anyone else use this? I hunted that little 1 inch roll for WAY too long before i said "forget it" & hacked right into it! And the glitter for this project?! I swear, i felt like i should be wearing nipple covers & swinging on a POLE! It was everywhere...

Because i said i would post pictures that very next day & i didn't, i am offering up a "peace offering" of CAULIFLOWER! haha! Actually, i found this recipe on another blog (forgive me for not mentioning names, but i read so many of these darn things... i think she was a vegetarian though, if that helps!).

It is SOOOOOOOO good & a GREAT Winter recipe:

1 large head of cauliflower

1/2 cup bread crumbs (i used plain, she used seasoned- YOU pick)

2 TB grated Parm Cheese

1/4 C melted butter (I used 1/8 C & it was too much for me, but if you know me well, you know i am somewhat of a FREAK about NOT using butter- although IF i use it, it must be REAL, none of that 1 molecule away from plastic crap for me!)

1/8 tsp garlic powder, 1/8 tsp salt

1 pinch dried oregano/1 pinch red pepper flakes (YUM)

clean & trim the leaves& brown spots off the cauliflower (duh), cut into bite sized pieces then put in a steamer basket w/ 1 inch water in the pan. Cover & boil about 15-20 min (till tender)

Pre-heat your oven to 375 & get a medium bowl for some mixin'

Put all your dry ingredients in the bowl with the butter that is MELTED. Once the cauliflower is done, mix it with the breadcrumb mix & put in a baking dish. Bake this @ 375 till golden brown, or 15 min.

You WILL thank me later, or that vegetarian if you happen to run into her! Darling daughter loved it & according to her "i only liked cauliflower when i was a baby, right Mom?" I was going to post a picture of the cauliflower but it was gobbled up, lickety split...

*~*ENJOY... *~*

I'm off to FINISH those custom orders that are headed to CHICAGO this Friday!

Monday, November 17, 2008

SNOW? Seriously...?

The view from my back window...
Is it REALLY that time... snow? Ugh... It's not like i don't know it's coming, i DO live in Michigan. Not just Michigan, but the west side where we get that stuff called "lake effect". It's not so much the snow that i hate... it's the COLD! The cold just hurts me to the bone, literally!
The other part of winter that we ALL hate- the flu, the colds, the gross little noses... Darling daughter's been coughing & the runny nose.... ugh... I feel like i have to wipe EVERYTHING down with these wipes:


i went around this morning wiping light switches & door knobs, oh & the flusher on the toilet... i could let this disinfecting get a little out of control- ha! It's just that constant mental picture of her touching her face, coughing into her hand, wiping her nose then touching EVERY surface in the house... well, EXCEPT the flusher on the toilet! I sure wish i could get her to touch THAT! I've been known to write on the underside of the toilet seat with a sharpie marker "put the seat & lid down", now maybe i need to color the flusher HOT PINK or something... anyway...


A couple new projects going on:


When i first brought darling daughter home from China, my Church was updating their "baby bay". They had someone come in & take pictures of several of the little ones. The photo's were then mounted on canvas & hung all over the nursery. I was so excited when darling was hung in the front window of the nursery. The church i go to is an old MALL, seriously, a mall! I'm pretty sure the baby area use to be a tanning salon, so the "front window" is a large display area. (oh great a banner is running across the bottom of my tv screen, my county is under a Lake Effect Snow Advisory....). Now, 4 years later, they've re-decorated the baby area, & i was lucky enough to get this large b/w photograph. This is just an idea i drew on the plastic with a... sharpie (of course- i sharpies!!). I'm going to paint the canvas a solid color & then add something whimsical, i think it's going to be SOOO cute... how could it not, look at that face!!
I also bought the deep cut blade for my cricut http://cricut.com/ I'm really excited about it, now that i figured out how to change the settings, so it cuts thru chipboard without making a sound like it's tearing the machine apart! Here's a sneak peak at my 1st project:

I hope to finish it today, get it hung & then I'll post pictures tomorrow.

I need to get going i have 2 custom orders that i HAVE to get done...

a special birthday "cutie~cupcake" & an embellished putter! FUN!! Since those must, must, MUST be done today, I'll post pictures of those tomorrow also...

Have a GREAT Monday... & stay WARM!!

Tuesday, November 11, 2008

Sneak Peek...

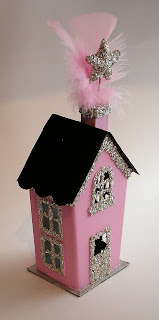
Here's just a little sneak peek of my little Christmas houses:

I'm not sure if i like the "snow" or not... I think i need a little more practice applying it. The glitter is that REAL silver vintage glitter & really is worth the EXTRA $$! I was glittering away yesterday & even found a piece in my mouth... i wouldn't recommend it!

I found this darling artist on etsy today. Her blog is called Little Miss Crafty & here is a link to it:

http://www.littlemisscrafty.blogspot.com/

Her etsy shop is called: CraftyMissJuliet

I'm not sure if she minds me adding some of her pictures, so i better ask before i do that, but in the meantime check her out for some CUTE stuff!

Happy Tuesday... I'm off to find my cowgirl hat & chaps, i'm going to the Dr... You know "the Dr." as in "put your feet in the stirrups"... Yee Haw!

Monday, November 10, 2008

i'm back...


Sorry, it seems like i haven't had an update in forever & honestly, i've felt like i haven't done anything worthy of blogging about. I do have some exciting (to me) news, i was the featured artist on Brenda's blog & here it is if you'd like to check it out: http://brendasjewelrybox.blogspot.com/


Brenda also has an etsy store, so check her jewelry out... Christmas IS coming! I see snow on my deck, so I'm sure it's comin'.


Darling daughter was so so SO excited about the snow, I could have choked her... just kidding! She LOVES the cold & the snow and I HATE it. As she walks thigh high in the back yard (last year, we don't have THAT much, YET...) i wave from the kitchen window & hope she's having fun out there... I SHOULD be making snow angels, I should be photographing HER making them, I should be making a snow family... but NO thanks, I'll watch from the inside & drink HOT coffee!
So, I'm working on some new little Christmas Houses & hope to have them done today. I finally bit the bullet & bought REAL silver glass glitter- this is NOT your $2.99 glitter... It's what they used on a lot of vintage Christmas ornaments & is SPECTACULAR! Since it's PURE SILVER, it's super-duper glittery & with time, will tarnish. I've been dying to try it out & got a bug up my butt with these little houses, so I've been gluing & sprinkling but am being so careful to save every loose speck- what a miser!!
Before I forget, i have to give kudos's to my husband for getting the bathroom painted... I'll post pictures as soon as I get the decor put up & yes, this is the part i actually DO finish... Now what can i tear up next??...
i'll leave you with some ~CUTE~eye-candy:


This darling doll is from theblackapple.etsy.com Good Luck ever getting one, she sells these out in the first 10 seconds that she lists them... BUT, she now sells kits to make your own (without her cute painted faces though...)

Chandelier by Teesha Moore... I AM going to make one of these this next year... Not sure I could finish it yet THIS year....

Ok, happy Monday... I'll be back tomorrow with pictures of Christmas houses... I PROMISE!

Tuesday, November 4, 2008

Pictures of an EASY lightbox...


Ok, don't laugh at my ghetto-light box!! I left it outside for a few min. while i ran inside to get away from the BEES!! It was a little breezy & tore my tissue paper. It looks pretty nasty but is a neat trick for getting better shots than you can on your kitchen table with the electric box humming while you fire up every light in your home! I like to take it outside on my deck WHEN we get sun & take my pictures- all while trying to keep my shadow OUT of the shot! My least favorite part... trying to get a great picture of a product. I know it is the ONLY way to really sell your artwork, but BORING....!!!


See how the poster board is "ramped", this will give you a seamless shot. Depending on what you're taking a picture of, you may want to make sure your box is either bigger or covered more with white paper. I usually take my shots from further back then go in & crop them closer & make sure the box isn't showing. See pictures *below*


I still think a NEW camera would help me out... hint, hint!!

I hope this helps you... if you have any questions, let me know!

Happy voting Day!!

How to make a light box

For those of you wanting a lightbox for your etsy items... this is really easy & does a pretty good job!
~misschell


How to Create an Inexpensive Photography Lightbox
Good jewelry and close-up photography requires good lighting. However, being able to light a piece properly to show the true color and beauty of it can be difficult. A light box is a great solution. It provides light diffusion and a uniform background against which to place your piece. They can be expensive though. There is a solution, costing as little as $2 (or free if you already have all the materials), using a cardboard box, poster board and some tissue paper. This light box can be used with any light source, and even outdoors.
window.google_render_ad();

[edit] Steps
Choose a box appropriate for the size of the objects you will photograph. You may find that you need to make boxes in various sizes.
Secure the bottom of the box with packing tape. Use more packing tape to secure the bottom flaps inside. This will keep them out of the way.
Lay the box on its side, with the opening facing you.
Mark lines about 1 inch (2.54 cm) inside each edge of the box on each side and on the top. A standard 12" (30 cm) ruler makes the perfect straight edge and is the right width.
Using the box cutter, carefully cut along the lines you drew. You can use the ruler as a straight edge to guide your cut. It is not necessary to get the cuts absolutely straight. Notice that the flaps on the front of the box have been left on for now to add stability and make it easier to cut. You may find that taping the front flaps shut makes it easier to cut.
Cut the front flaps off with a box cutter.
Cut a section of tissue paper large enough to fit over each of the openings you cut. Then tape it to the outside of the box using cellophane tape. Start with one layer of tissue paper. After completing the box and making some test shots, you may find that you need additional layers of tissue paper to achieve the right lighting.
Use your box cutter and scissors to remove any stray pieces of cardboard from the front edge of the box.
Cut a piece of matte white poster board to fit the inside of your box. The piece should be in the shape of a rectangle, with the width being the same as a side of the box, but the length being twice as long.
Insert the poster board into the box, curving it up towards the top of the box. Curve it gently; don't crease it. Trim it if necessary. This will create an infinite, edgeless look for the background of your shots.
Cut matte black poster board in sections large enough to cover the tissue paper areas. This will allow you to block light from certain directions when taking photographs.
Add your lighting. Photo lights, flashes, and even standard desk lamps can be placed on either side or above the box to produce the desired lighting effect.
Take some test shots as you go to see how well your tissue paper filters and diffuses the light. Add layers of tissue paper as needed. This photo was taken in the example light box, and is not retouched (other than cropping). Now go start taking great photos!

[edit] Tips
Make sure to use matte and not glossy poster board. Glossy poster board can reflect the light and cause glare.
Try other colors of poster board and even fabric to achieve the desired effect.
You may find that removing the bottom of the box makes it easier to just drop the light box over your subject.
If you take shots straight down from above, cut the bottom of the box like the sides and top, and cover with tissue paper. Then set the box open side down and cut a lens sized hole in what is now the top of the box. That way you can lay out your subject on a piece of white matte cardboard, then drop the box over it, and shoot the photograph through the hole.
If your camera has one, learn how to use its "custom white balance" (WB) feature--this can make all the difference when shooting items in this fashion.

[edit] Warnings
Be careful with the box cutter. It's hard to take photos without fingers! Always cut away from yourself and from your hands.
Make sure lights don't start a fire!

[edit] Things You'll Need
Cardboard box (size will depend on what you are shooting)
2-4 sheets of white tissue paper
1 piece of matte white poster board
1 piece of matte black poster board
Scotch tape
Packing tape
12" (30 cm) ruler
pencil or pen
Scissors
Box cutter

[edit

Monday, November 3, 2008

whew...

Well, i survived my 1st kindergarten Halloween party! We got all 22 ghost shaped rice krispie treats delivered...


and made the "craft". I ended up cutting foam sheets into bookmarks. The kids strung beads to make a tassel & put Halloween stickers & wiggle-jiggle eyes on them. Kid crafts really aren't my thing & as i was aimlessly meandering Hobby Lobby, i had a mini panic attack. They really didn't have much of anything as far as a "kit" craft for kids... I don't even know what kids CAN do... but i figured any 5 year old can handle stickers! They actually seemed to like it, so we were good!


I just got the mantle decorated & now... it won't be long before this is down & CHRISTMAS is up, hard to believe!!

i know this picture is just rotten.... IF only i had that new camera....☺

Spooky new picture frame for my etsy shop. Yeah, i know, Halloween is OVER, but.. you're just printing your pictures now, right??


That's a 3-D chandelier (LOVE those!!) on a black wood frame. I have another one I have to get pictures of- robin egg blue with a black chandelier.

I need to get some pictures of my clipboards & the other frame while i have some sun here. Hope you're out of your sugar coma!

Make sure to check out www.etsy.com so many cool things!!!

Related Posts Plugin for WordPress, Blogger...