Let me start by saying I DID go to my running club Monday, let me also say it was cancelled... Yes, I am going back again next Monday because they ARE meeting and they ARE running....4 miles! The guys says "you can run 4 miles can't ya?" and I said "I guess we'll see, won't we!". I just got off the treadmill...i can do 2, how hard can 2 more be?
Anywhooo... moving on!
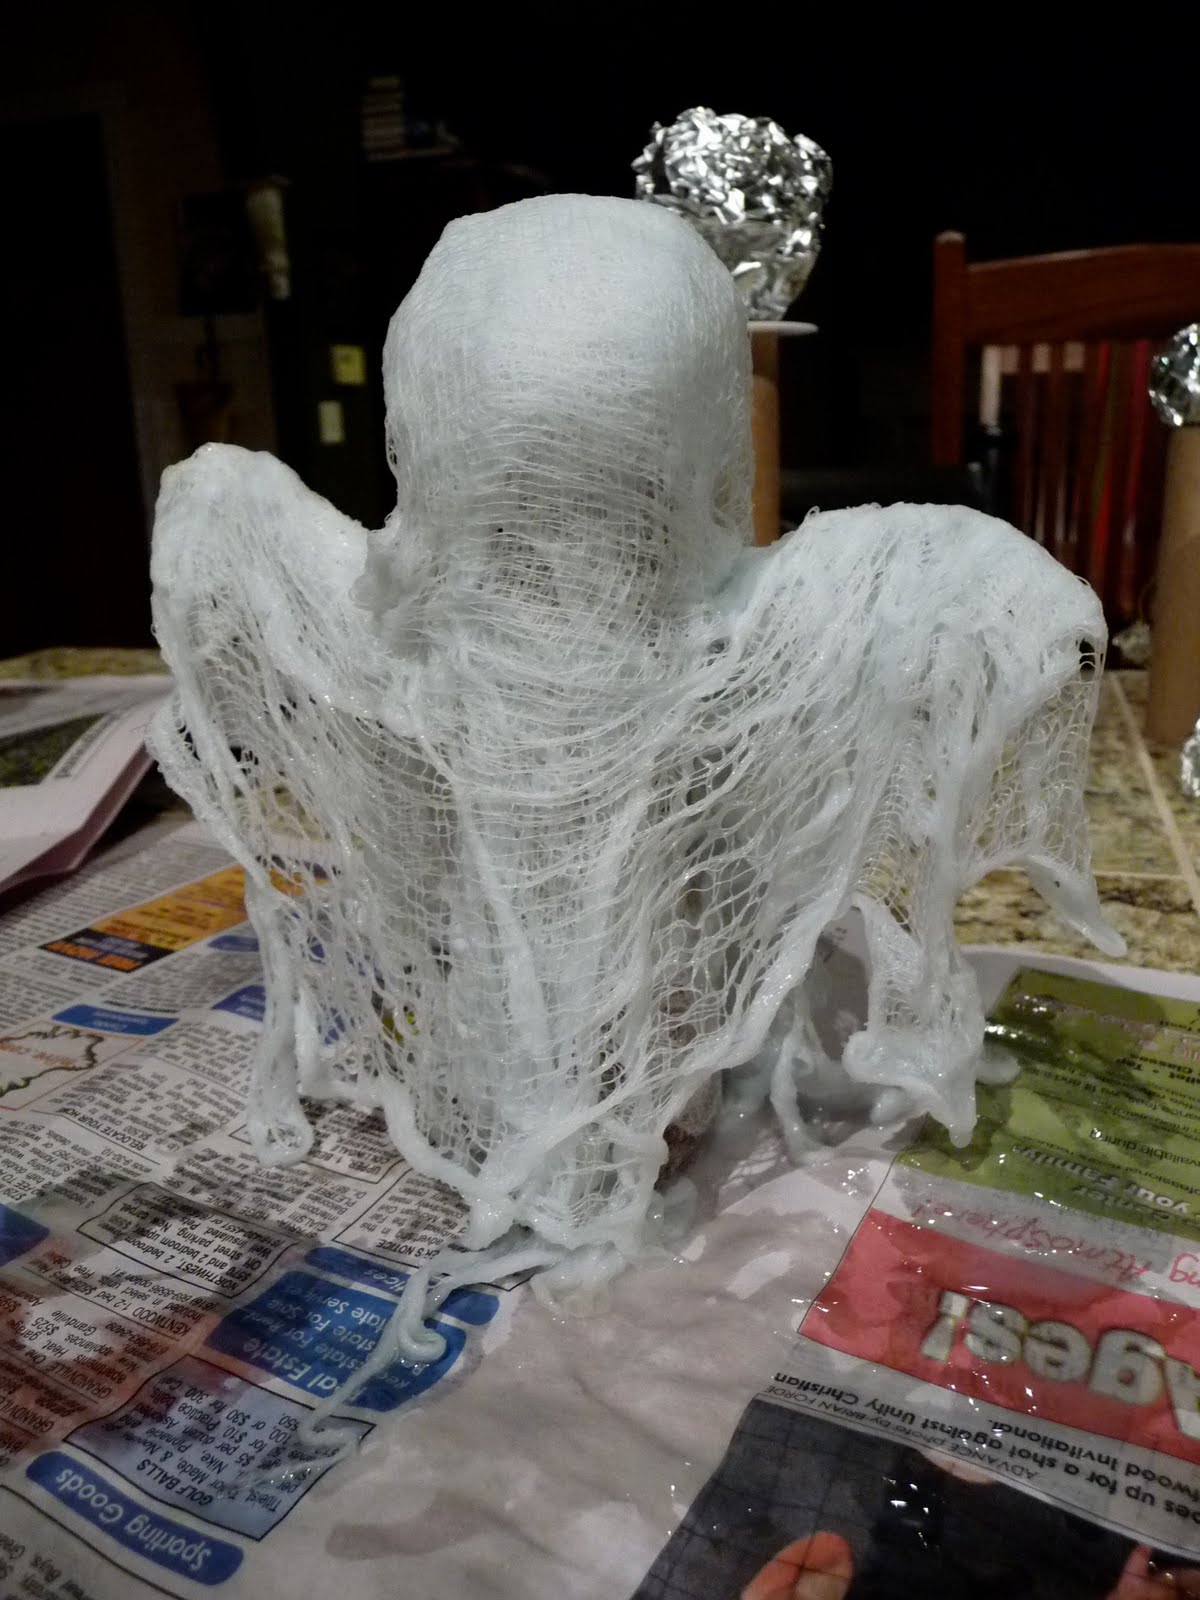
The cheesecloth ghosts I promised!! Darling and I worked on these last night and if you have little ones, or hyper ones, or you're PMSing... run 4 miles instead!
This turned out to not be so great for little ones. Darling is 7 and pretty mature so she did ok, but it is MESSY thanks to liquid starch!
Grab your supplies and lay down a layer of newspaper or better yet a cheap plastic table cloth!

tp roles, liquid starch, foil, wire, small bowl, wire, wire cutters, cheesecloth, tape, pointy thing and white spray paint (yeah I added 3 items after we gave it a go!).
Take your foil and make a ball, then take another bigger piece of foil, wrap over the head and and pull it down to a point. Darling loved the foil wadding, so this is the part kids can help with (unless you have PMS then just do the whole thing yourself or someone is going to get hurt!).

The long point will go down in your tp tube

then take your "pointy thing" and put a hole on each side of the tube

Feed a piece of wire through the hole (you may have to remove your foil and then re-wiggle it down in around the wire).

I found that it was best to bend the wire up and tape around the entire tube...

add some foil to the "arms"
At this point it IS best to spray paint the whole thing white, I found the cheesecloth covered better, but you do NOT have to, you'll just have to add more layers to cover the foil and the brown paper. Trust me, you wanna spray it!
Now this is where it gets MESSY!
Pour the liquid starch into your bowl (not your bowel as I've been known to type-ha!).
Those plastic lunch meat dishes work perfectly!
Fill it about 1/3 to 1/2 full.
Take your cheese cloth and drape it from front to back to see how long you need to cut it to cover from the front, up over the head, and down the back. You'll also need to cut about 4 smaller pieces to drape over the arms- however long you want it to be- NO rules with this craft, well, except:
**don't drink the starch, chew on the foil, or do this with kids if you have PMS!**
After you have your pieces cut into strips, make sure you peel it apart- the cheesecloth is very thin!
Dip the cheesecloth into the starch and pull it up between your 2 fingers to ring it out. It's a bit tricky to spread this out once it's wet, but you CAN DO IT!! Lay it from front to back.

It doesn't matter it it's a bit long, better than too short!! It looks more ghostly that way! See how long I did the arm pieces? The more raggy they hang, the better, so don't spread it all out flat! Perfectionists-RELAX!!
It IS best to do several thin layers of cheesecloth than to get lazy and use it without peeling it into single layers- trust me!
Now, after you've covered it with a couple layers, pinch the sides in to hide the TP roll, cover the arms and add a few more layers so it's ALL covered. After this you'll want to set them on something to dry, a cookie sheet with wax paper or ceramic trays work great! If you don't have a ceiling fan going or a small fan, you might want to let it dry between layers. Personally once I got into that starch, I just wanted to finish it up!!
We are going to try a test run by adding some glitter and felt eyes... I'll post the final finished project when it is...
final and finished!!
Boo!
IF you make these, send me a link and I'll add you to the next post!
a little plug about my BABY/KID HAT DRIVE

As most of you know, my daughter was adopted from China and I left a little piece of my heart there. I'm collecting hats to keep the children and babies warm in the winter. Many live in orphanages that are without heat.
1. make a baby hat, toddler hat, or kid sized hat
(you can take the non-crafty way out and buy one if you must)
2. Send to:
David Shellenbarger
c/o chinamommy
146 E Main
Caledonia, MI 49316
3. I need them in my hot little hands BY Oct 31, 2010.
4. I'll take care of shipping them to CHINA this fall.
any questions- please feel free to email me!!
chinamommy@yahoo.com
and don't forget...
3 comments:
Bummer your class got cancelled... next week though! I love the Ghosts! They are super cute even if they are messy to make! You are such a cute Mom!!!!
Really cute!! I just HAD to come over here and tell you something- the comment you made about the dreams you had in college - IHAD THOSE TOO! I was also in college when it happened. I have had it happen once since then but I think it happened about 3 or 4 times during college. I was in the dorm and I could hear everything going on around me but could not move!! I knew my roommate was in the room. I could hear her watching a Brady Bunch rerun! When I finally woke up, she looked over at me and told me I was making a really weird noise. This has always baffled me and I have researched it a bit - the only answer I could come up with is a condition called "sleep paralysis" It just shocked me to read your comment and I really do think we might just be the same person!
Those ghosts are too cute! Looks like a great weekend project for me and the munchkins this weekend.
Post a Comment